Magic: The Gathering has quite a few things that make it the great game that it is. It has fantasy/RPG elements, highly strategic gameplay, amazing art, and a nuanced complexity to its deck building. Today it is MTG deck-building that we will look at. Specifically, some concepts to help you build cohesive, powerful decks and increase the number of games you win. A very basic rundown is as follows:
- Pick a strategy for your deck, including how it will win games
- Find cards that work toward that gameplan
- Have a proper mana curve for your strategy
- Play an adequate amount of lands for each of your colors
- Once you have a complete decklist, playtest it to see what does and doesn’t work
- Look at not only how your deck wins games but also how it loses games
- Make changes based on your testing and improve the areas that are causing you to lose
- Jump back to step five and go from there. (However, remember that no deck wins all of the time or has stellar match-ups against all other decks.)
If you are somewhat lost at this point or don’t know some of the terms mentioned above, worry not. We’ll break down how to easily find cards for your deck, when and how to overlap strategies, what a mana curve is, how to perfect your mana base, and much more below. So, grab a notepad and get ready for advanced MTG deck-building 101.
Note: This article will focus on non-EDH formats with 60-cards decks.
Table Of Contents:
- How Do You Build A Deck That will Win Games?
- Fundamentals
- Pick A Strategy For Your Deck
- Find Cards That Work
- Adding Sub-Strategies
- Have A Proper Mana Curve
- Play An Adequate Amount Of Lands
- Play Testing
How do You Build A Deck That will Win Games?
These ideas are going to give you a good foundation for building decks in Magic. However, like almost all things in Magic: The Gathering, there are exceptions to nearly all of this information in certain cases. In other words, these are not hard and fast rules. If you’re going to break them though, make sure you have a reason for doing so.
There are a plethora of deck strategies and just as many ways to go about building those strategies. So many that it would be impossible to cover them all in detail in one article. Instead what I hope to do is give you the tools you need to build stronger decks regardless of what they are.
Fundamentals
These are concepts that are going to apply to most deck-building situations regardless of your archetype or strategy. The vast majority of deck issues usually come from one of the issues below. Getting good at addressing these few fundamental concepts will improve your deck-building all by itself.
Deck Size
The minimum number of cards required for constructed formats like Standard, Modern, Vintage, and Legacy is 60 cards. You should almost always play a 60-card main deck. Some notable exceptions include when building a Battle of Wits deck or when playing with Yorion, Sky Nomad.
Related: How To Draft MTG: The Complete Guide
While you are allowed to play more cards in any deck, doing so means that you’ll be less likely to draw the best cards in your deck. You want your deck to be able to get to its game-winning cards as quickly and as consistently as possible. So if you currently play more than 60 and aren’t performing well try and trim down to your best 60 cards.
Interaction
Next, play some amount of removal, disruption, or interaction. It’s easy to focus solely on what your deck is doing while putting it together. In fact, that’s what you’re supposed to be doing. However, you’ll need things to deal with opponents’ threats. As well as stop opponents from derailing your game plan.
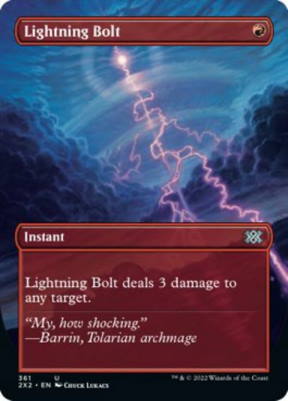
This would include removal spells like Murder, Path to Exile, Lightning Bolt, Pit Fight and Vapor Snag. As well as disruption such as Ensnaring Bridge, Counterspell, Blood Moon, Thalia, Guardian of Thraben and Thoughtseize.
As well as cards that protect your game plan if you have specific cards that are key elements to your strategy. Some examples include Giver of Runes, Veil of Summer, Apostle’s Blessing, and Force of Negation.
Exactly how many of these spells you run and which ones depend on quite a bit. We’ll go over this in more detail below. Just be sure to have at least a few answers or ways to protect the important pieces in your deck.
Lands
Regardless of your deck’s strategy, you’ll need to run some number of lands for your deck to function. The exact number depends on the cost of your spells and your strategy. Skimping on lands to make room for more spells is very common and is always a bad idea. Without enough lands, your deck will never consistently win games.
Many people take a very formulaic approach to lands when deck-building. While being mathematical is a good idea, don’t get too caught up on an “aggro decks play 20 lands and control decks play 26” mindset. The number of lands you should play can differ even within specific archetypes, so always test and form your own opinions.
With that said, the less the spells in your deck cost, the fewer lands you’ll need, and vice versa. I recommend that players who are unsure how many lands to run start with 23-24 and go from there for most decks. If your deck has an extremely low mana curve, where all your spells cost between one and two mana and you play no spells over 3-CMC, start with 20.
We will talk in-depth about mana bases and their variables below, so don’t worry just yet. The numbers above serve as a starting point to ensure you have enough land to sufficiently test your deck. Testing is the best way to tell if you play enough lands for your deck to run smoothly.
Pick A Strategy For Your Deck
First, you’ll want to work out what it is your deck is trying to do and how it will win games. Even relatively basic ideas work, as long as you have a clear game plan. Having a goal for your deck will help you identify which cards you’ll need to play to achieve that goal. As an example for this article, let’s use Vampire tribal decks in Modern.
Related: MTG Modern: A Getting Started Guide (Primer)
This is a great starting point. However, there are several ways to build upon most ideas and some refinement will need to be done to hone in on your idea. The most important question to answer is “How will the deck actually win games?”
Win Condition
Finding out how your deck will win games is also very important. Using our example, simply having Vampires on the battlefield without any synergy or game plan won’t win games. The exact way the deck wins will also greatly affect which cards go into the deck.
For example, a Vampire aggro deck may play cards like Vampire Lacerator, Fatal Push, and Legion Lieutenant. While a Vampire aristocrats deck would likely prefer things like Viscera Seer, Blood Artist, and Bone Splinters in those spots.
Further still, a Vampire deck built around the “madness” mechanic would probably play Falkenrath Gorger, Stromkirk Condemned, and Fiery Temper. With that said, a card like Bloodghast could go in all three of the decks mentioned above.
I make a point to give these examples to illustrate the fact that a card that is great in one version of a deck may be bad in another. It all depends on how your deck will work toward victory.
Potency And “Best-Case Scenario”
There’s an experiment I like to do somewhere along the line in my deck-building, once I have my win strategy down. Lots of ways to win sound great in your head.
However, if you’re going to actually win games it helps to know if your strategy is potent. So before you even get to the testing stage ask yourself how well your deck could win the game if everything went exactly how you wanted it to.
Related: Complete List of MTG Arena Codes
Of course, it won’t go exactly how you want it to but that’s the point. If your opponent does nothing to help or hinder you and you draw the best possible sequence of cards how effective is your strategy? If your best-case scenario is not great, then it won’t play well under pressure either. So consider how it can be improved or tweak the idea now.
Trust me, it helps a lot to get this out of the way early and will save you a lot of grief. Furthermore, it is a great exercise for identifying your best lines of play and helps in evaluating your best opening hand.
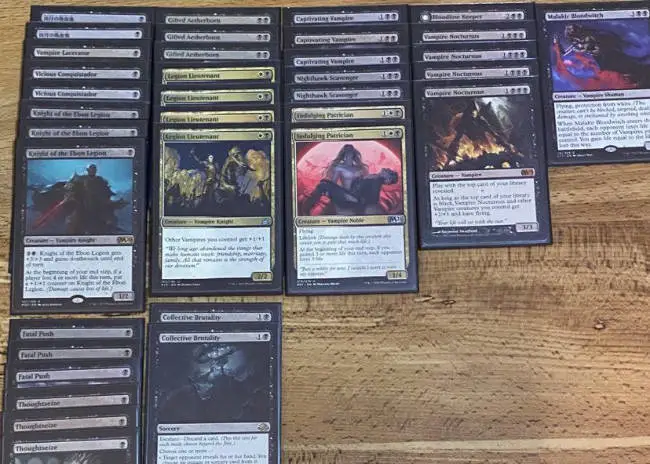
Here is an example just so it’s clear what I mean. This is a real-life example from a Vampire aggro deck of mine.
The best-case scenario is as follows.
Turn 1: Play Vicious Conquistador.
Turn 2: Play Legion Lieutenant and attack for 3 (2 + loss of 1 life) with Vicious Conquistador. The opponent goes to 17.
Turn 3: Play Captivating Vampire and attack with Vicious Conquistador and Legion Lieutenant for 7. The opponent goes to 10.
Turn 4: Here an attack from Captivating Vampire, Vicious Conquistador, and Legion Lieutenant alone is lethal, without even playing a four drop.
So, if everything went according to plan the deck could easily win on turn 4.
Find Cards That Work
With step one done you can start to find cards that work to achieve the goals you set for your deck. This is one of the most exciting parts of the deck-building process. Websites like gather.wizards.com and scryfall.com have advanced search options where you can filter cards by color(s), type, sub-type, format, mana cost, and more.
You can also see what other players are doing for similar strategies using websites like mtggoldfish.com and tappedout.net. Things are liable to change quite a bit while building so be sure to test out your deck/cards before you make big purchases, that way you don’t waste money.
How Many Copies Of Each Card To Include
How many copies of each card you include in your deck is very important for the consistency of your deck. So, how do you know how many of a given card to include? Let’s take a look at a few concepts, ideas, and general guidelines.
I want to preface the general guidelines with the concept of diversity. Sometimes you want many copies of an effect, but want to diversify the effect a bit. For instance, let’s say you want a total of 8 counterspells in your control deck.
You could get a much wider variety of answers by playing a few copies of several different counterspells instead of a full playset of just two. For example, you may run three Counterspell, two Mana Leak, two Spell Snare, and one Spell Pierce. These all serve a similar purpose, but each has situations where it would shine.
Another example could be removal. If you play Orzhov Midrange, you may run some number of Fatal Push, Path to Exile, Vanishing Verse, and Damn. They’re all removal, but have slightly different strengths and weaknesses.
With that out of the way, let’s look at the generally accepted formula for how many copies of a card you should play.
Four Copies:
Play all four copies of cards you want to draw in every game and don’t mind drawing multiples per game. These cards either carry out your deck’s game plan directly or do something that helps you find and/or play cards directly in your game plan.
Three Copies:
Play three copies of cards that you want to see in all games, at most times during the game. These cards also work directly towards your strategy but are less essential or less optimal at times.
This is oftentimes because of things like a card being legendary. The “legend rule” says that you can only control one copy of a legendary permanent at a time. Therefore, drawing multiple copies can often be redundant.
Furthermore, this includes cards that need to be drawn at a specific time in the game or that vary in utility based on the
Two Copies:
Play two copies of cards that you want in some games but not all games, or cards that you want in the late game when you’re already executing your game plan. These cards will generally be cards that you’d like to have access to in a small number of situations.
A perfect example of a “2 of” card would be Crypt Incursion in Dimir Mill decks. It’s not a mill card and it’s not something you’d need against every deck or even every game against decks where it is good.
Furthermore, it is only effective later in the game when the opponent’s graveyard is full. However, there are a lot of games where drawing that one copy will swing the whole game in your favor.
One Copy:
Include one copy of cards that you are okay with never naturally drawing in a game but still want access to in your deck. A great example of this is cards that you plan to tutor for with other cards like Profane Tutor. Or cards that are good in only very certain situations. A good example would be a single Pact of Negation that could be tutored for in a combo deck.
Another reason to play one copy of a card would be to have copy number five of another card that you already have a playset of. For example, Zulaport Cutthroat could be an additional copy of Blood Artist.
Play Good Cards
This may seem like a no-brainer. However, at times you can certainly find yourself making room for less-than-optimal cards without realizing it.
Some examples of “bad cards” could be spells that don’t do much at all when you cast them and count on you waiting for several turns or require extra resources to get value. Often termed “do nothing” spells, these are easy ways to waste a whole turn if they get removed before they can do their job.
Another common issue I see is players playing cards that are strictly worse than others for the same mana cost. For example, playing Enraged Ceratok instead of Questing Beast. They have the same exact mana cost and the same power & toughness. However, you get so much more for your four mana with Questing Beast.
Perhaps an even better example would be playing Child of Night instead of Gifted Aetherborn. Granted, the latter does require double black mana to cast and that may be something to take into consideration in very specific circumstances. However, the vast majority of times you’d want to play Gifted Aetherborn instead since it offers so much more for the same resources.
I know not everyone has the budget to afford some of the more expensive staples and that’s perfectly fine. My point here isn’t to say you have to play specific cards, just be sure you play the best cards possible for your strategy within your format and budget.
Stay On Track
Keep in mind that your deck will need somewhere between 20 to 25 lands depending on your strategy. So this leaves you between 35 to 40 spots for actual spells. Keep this in mind from the start, so you don’t add too many spells and have to make cuts later on.
Once you have your plan and start adding cards it’s easy to want to add in a lot of cards at once. However, you’ll want your game plan to be as streamlined as possible, so be sure that all or almost all of the cards in your deck are working directly toward your plan.
There are exceptions to this. Just be sure that you have a conscious reason for including cards that fall outside of your main game plan.
Adding Sub-Strategies
It’s rarely worth it to play two completely different strategies in the same deck, as it divides your deck’s resources and you probably won’t end up doing either one well. If you find that you often lose because you “draw the wrong half of the deck” so to speak this may be your issue.
However, when cards align naturally with what you’re already doing and enhance it, it can work wonders for your deck.
Again, you don’t want two separate strategies. So try and find cards that incorporate another strategy or payoff into what you’re already doing. Think of this more as an alternative means of benefiting from what your deck already does than adding a completely new strategy.
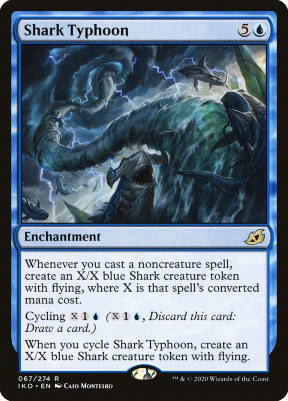
An example of a card with good overlap would be Shark Typhoon in control decks. It doesn’t control the game by countering or removing your opponents’ threats. Nor is it quite a straight-up win condition.
However, it generates value for nearly all other spells in the deck. Furthermore, since it can be cycled to create a token, it’s never a dead card all by itself.
An example of a card that seems to synergize at first but actually doesn’t would be a card like Obelisk of Urd in an aggro/tribal deck.
While it does pump up your creatures, having to tap all your creatures for convoke, means you won’t be attacking with them as you should. Without the convoke the mana cost would be too high to be impactful in an aggressive strategy.
How To Add A Sub-Strategy
The first step in adding a sub-theme to your deck is to look at what your deck is already doing well. Then think of other things that benefit from it as well, or ways to further capitalize on it.
For example, let’s say you’re sacrificing or discarding lots of small creatures as part of your primary game plan. Then a small suite of mass reanimation spells like Return to the Ranks or Rally the Ancestors would be logical.
They aren’t small creatures or ways to discard/sacrifice them. However, for a few spots in the deck, it is a massive payoff for what you’ll already be doing. Furthermore, it doesn’t need lots of setup outside of what you’re already doing.
Ask yourself if the cards you’re adding give you additional value for the things you’re already doing. If it does, it may be worth considering. If they require adding lots of cards that fall outside of your primary strategy to function, leave them out. You can always build a whole deck around that idea later.
Have A Proper Mana Curve
Mana curve refers to the mana cost of the cards in your deck and how many of each cost you have. Generally speaking, cards with a high mana cost are more powerful than cards that are very cheap to cast.
However, filling your deck with only powerful high-cost cards means you won’t be able to cast them for several turns. On the other hand, playing only low-cost cards means you’ll likely fall behind as the game goes on. So when people say “mana curve” they usually mean evaluating the number of cards you play at each mana cost and finding a balance between high and low-cost cards.
Generally, this is accomplished by playing more copies of cards that have a lower mana cost and fewer copies of cards with a higher cost. That way you have a higher chance of drawing more powerful cards as the game goes on. While also giving you a good chance of having something to play each turn, and ideally using all the mana you have available to you.
For example, you usually wouldn’t want to play a deck that has no two-mana spells but has lots of five-mana spells. I think most people grasp this basic concept. So let’s move on to the more complex elements of the mana curve.
Mana Curve Complexities
As mentioned, you want to play more and more powerful cards as the game goes on. You also want to have something to play each turn and ideally use all the mana you have available to you. However, this doesn’t always mean you have to play more two or three-mana spells than anything else. This is because not every deck wants to play a 1-drop, then a 2-drop, followed by a 3-drop, and so on. Let me elaborate.
I prefer to think of a mana curve in terms of play sequencing. So think about what card you’ll actually be hoping to cast each turn. Then ask yourself “If I play ‘Card A’ what would I want to play next?”
Related: The Best Magic The Gathering Art
Say your deck has playsets of Noble Hierarch and Birds of Paradise. Assuming you play a land the first two turns, you’ll have three mana come turn two pretty often. To make use of your mana dorks, you’d consistently want a three-mana spell on turn two. With enough mana dorks, your curve might skip two mana creatures completely.
Another example would be playing with a card like Heartless Summoning. If your plan is to drop it on turn two as often as possible, then plan your curve accordingly and play more four to five CMC creatures. On the other hand, if you’re building around Burning-Tree Emissary you might not play any creatures over two mana.
Casting Spells “On Curve”
Another thing to consider is what turn you actually want to cast a spell. For example, take a card like Aspect of Hydra. This is not a spell you’re ever going to cast on turn one. So despite it costing one mana, it would be deceptive to consider it as a turn-one play. In the same line of thought, if you’re playing Shriekmaw as a removal spell with its Evoke cost, consider it a two-mana spell instead of five.
For many decks the “1-drop, then a 2-drop, followed by a 3-drop, and so on” approach is correct. Just be sure to plan according to what you’ll hope to cast each turn. Then ask, “If I play ‘Card A’ what do I want to play next?” before assuming one size fits all.
How To Evaluate Your Mana Curve
So, how do you get a clear picture of your mana curve? Create a pile for each CMC starting from left to right, starting with 1-drops. So put all of your 1-mana spells into a pile. Then move to the right and make a pile for 2-mana spells. Continue to do so until all your non-land cards are sorted by cost.
Stack the cards so that you can see the names and mana cost of each card. Now is the time to rearrange things to how you actually hope to cast them. So, move the cards like Aspect of Hydra or removal spells that you won’t necessarily want to cast “on curve” to a separate pile underneath its corresponding mana cost.
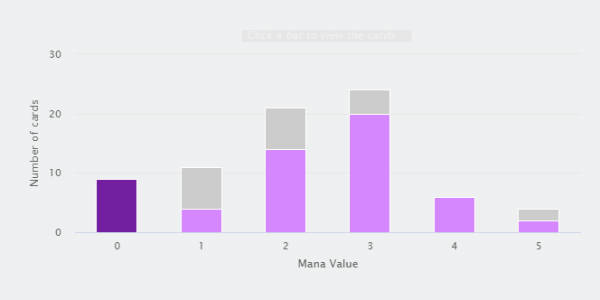
You should now be able to clearly see how many spells you run for each mana cost. As well as get a feel for what you are likely to be casting each turn. Now is a good time to count the number of spells for each mana and make sure you don’t have any large gaps in your curve without a reason. In general, you want your numbers to peak around the two or three mana spots and taper off from there.
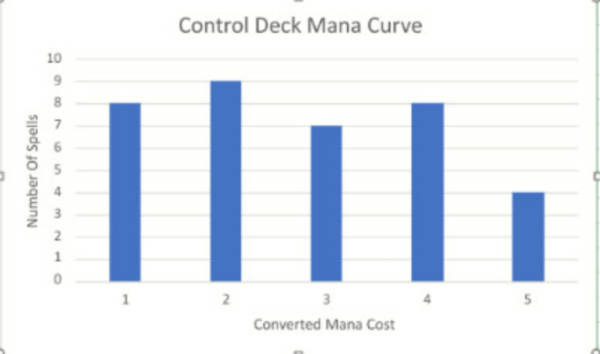
With that said, the more aggressive your deck hopes to be the more you want to focus on the one, two, and three drops for your deck. While more controlling strategies will be a bit more geared towards high mana cards, as they want to drag the game out.
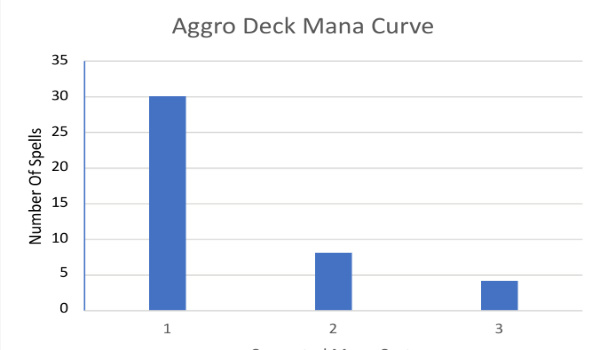
As you can see from the chart above, the aggro deck on the left plays mostly one-mana spells. While the control deck on the right plays several four and five-mana cards.
Play An Adequate Amount Of Lands
Not playing the correct number of lands is probably the easiest way to make your deck misfire and is a very common issue deck-builders encounter. After all, without lands, you can’t cast spells.
You need to have an adequate amount of land to consistently cast your spells but not so many that you draw too many. As mentioned above, I recommend that players who are unsure how many lands to run start with 23-24 and go from there for most decks.
Related: MTG Fetch Lands: Why Are They So Good?
If your deck has an extremely low mana curve, where all your spells cost between one and two mana and you play no spells over 3-CMC, start with 20. This is a baseline to make sure you have enough land to at least properly test your deck. Let’s take a look at mana bases for in-depth.
Generally speaking, if you want a certain color consistently on turn one, you need 16 mana sources of that color within your deck. Remember, this number for later. Sweet 16.
Mono-Colored Decks
Decks that contain just one color are the most straightforward. For example, if you are going to play 23 lands and only need one color, it’s very easy to get to the 16 mentioned above. This also means you have more room to run lands that do things besides tap for mana.
While utility lands can be super helpful at times, you’ll have to be careful about how many you run. Many utility lands offset their benefit by coming in tapped under certain circumstances or not tapping for colored mana.
So if you have color-intensive spells like Tempest Djinn that need to come out on curve don’t overdo it on things like Blast Zone, Arch of Orazca, Field of Ruin or Faerie Conclave.
Multi-Color Decks – Counting Mana Cost By Color
The first step when it comes to adding lands to your multi-color deck is looking at what color your cards are, how much of a given color is in their mana cost, and where they land on your mana curve. The best way to do this is by simply counting the number of colored mana symbols for each color within your deck.
Let me give you an example. Let’s say your deck plays four Seasoned Pyromancer, which have two red mana symbols in their casting cost. So, counting each symbol on each copy of the card would count as eight red symbols. Do this for all the cards of each color within your deck and write down the total for each color.
Multi-Color Decks – Counting Mana Sources
Once this is done, you’ll have a basic idea of which colors of mana you’ll need to have the most of in your mana base. Again, if you want a certain color consistently, early in the game, you want 16 mana sources of that color within your deck. If you only need a color later in the game, this number can be lower.
With that said, if your deck plays two (or more) colors you won’t be able to achieve your requisite 16 sources of primary colors running only basic lands. For example, 16 basic swamps and 16 basic plains would put you at 32 lands total. Which is way too much.
So, here’s where you add in lands that tap for more than one color. Also known as “dual lands.” For example, Concealed Courtyard and Isolated Chapel tap for black and white. So now you can run 8 basic swamps, 8 basic plains, 4 Concealed Courtyard and 4 Isolated Chapel. This gives you 16 sources of both colors and 24 lands total.
Related: Dual Lands: All Your Questions Answered
A dual land counts as a mana source for each of the colors it taps for. So, one Blood Crypt counts as both a red and a black source. In this same line, a “fetch land” that can grab other lands, counts as one of each color it can fetch. For instance, a Jund Panorama would be counted as a black, green, and red source.
Three-Colors Or More
The same concepts for two-color decks apply when you add more colors. However, you’ll need to pay even more attention to where each color falls on your curve and create even more overlap between colors.
Let’s say you counted your mana symbols as described above and have 25 black mana symbols, 16 white, and, six red. You’ll need far more sources of black mana than white or red. However, you must also look at which colors you’ll need early in the game and run more of those.
For example, if that six red mana comes from three Eidolon of the Great Revel you’ll need many more red sources to have it by turn two than if it comes from three Inferno Titan.
In the case of something like Inferno Titan, where it’s high on the curve, you can get away with less than a full 16 sources. Furthermore, if many of the white spells are higher on the curve as well (or simply less important) you may not need a full 16 there either. You must test to refine your mana from these guidelines.
An example of such a three color mana base for modern (without the use of fetch lands) or pioneer would be something like this:
- 5 Plains
- 4 Swamp
- 3 Concealed Courtyard
- 2 Sacred Foundry
- 3 Blood Crypt
- 2 Savai Triome
- 1 Blightstep Pathway
- 1 Pillarverge Pathway
- 3 Godless Shrine
This 24-land mana base would give you 16 black sources, 16 white sources, and 9 red sources.
Don’t Neglect Basic Lands
Dual lands are a must for your multi-colored decks. However, like utility lands, this upside comes with a downside. For example, “shock lands” such as Godless Shrine or “pain lands” like Cave of Koilos will damage you. While things like Orzhov Guildgate or Savai Triomewill always come in tapped. So, run as few duals as is needed to comfortably run your deck.
Furthermore, basic lands are your friend and you should always try to have a basic land or two for each of your colors in your deck. You’ll be glad to have them if you come across things like Field of Ruin, Blood Moon, or Path to Exile.
They also make dual lands like Isolated Chapel that check for a certain land type to come in untapped much better. The same is true for cards like Cultivate that can only get basic lands.
Non-Land Sources Of Mana
Many deck-builders wonder if creatures and spells that produce mana affect your land count. The short answer is no. Of course, there are exceptions to this though.
The main thing you want to consider when looking at non-land mana is their mana cost, and how vulnerable they are to removal. The less mana it costs and the harder it is to get rid of, the closer it is to a land. For example, a one-mana spell that doesn’t have to stay on
While mana-producing creatures like Llanowar Elves count somewhat less as a land replacement since they can be removed pretty easily by most decks. There’s a reason for the idiom “always bolt the bird” after all.
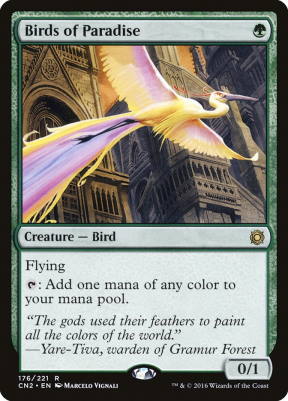
The “bolt” refers to Lightning Bolt and the “bird” is Birds of Paradise. What the saying means is, always remove your opponent’s mana-producing creatures.
So not only do you need one mana of the correct color on the first turn, but your mana dork must also survive long enough to be of use.
For these reasons, count a mana dork as roughly 25% of a land. Meaning a full play-set means you could hypothetically cut one land. However, make sure that the land you cut isn’t going to make you short on the color you need to cast them on turn one.
With that said, non-land mana that costs three mana or more to cast shouldn’t affect your land count at all. This is because you will have already needed to make several land drops to be able to cast them.
So they would fall more into the category of “ramp” or late game acceleration. The same is true for things that take quite a while to develop like Runaway Steam-Kin.
Play Testing
You now have a full decklist complete with a strategy, the spells to make it happen, and your supporting mana base. Congrats.
However, your deck is likely still far from the polished game-winning, finished product you’re looking for. Now it’s time to test, test, and test some more to see what does and doesn’t work the way you drew it up.
If and when you run into problems, don’t get discouraged. Rome wasn’t built in a day and neither are great Magic: The Gathering decks. This stage is where your ideas come to fruition and where your deck will evolve into its form. Let’s take a look at some tips for effective playtesting.
Play Some Games
The first step is to simply play some games. This could even be with a deck full of proxies, before committing to buying cards. Games in person or online work, just try and find someone who’s willing to work with your testing.
Related: How to Set Up SpellTable for Remote Magic
An amazing resource for testing is a program called cockatrice. The program is completely free and lets you build decks with any card in print. You can play against strangers or have friends create accounts and play with them. You can download it here if you’re interested.
The main thing is to get some reps in and see how things go. In this step, it’s good to play in a casual setting but also not pull too many punches for your deck. This will allow you to do things that will make it easier to actually test how different things work.
For example, if you drew a really bad opening hand you could take a free mulligan in a casual setting. Being mana screwed and not casting anything won’t teach you much about your deck. However, if problems like that persist you’ve likely got a problem with your mana base.
That leads me to my next topic. Test quite a bit and against several different decks before you jump to conclusions. Don’t make any changes after just one game. Test a few and look out for trends because those are what matter.
Diversify Your Testing
You should test your deck against as many different match-ups as possible. This will give you lots of feedback on your cards overall, instead of only how they perform in a certain match-up.
Furthermore, testing against only a few decks would mean that you are making changes to your deck for specifically those decks. Whereas, those changes may not be what’s best for the deck overall.
When you test, keep in mind that no deck wins all of its games or has favorable matchups against every deck. So don’t take every loss to mean something needs to change. Changing your deck to play slightly better against its worst matchups, is probably going to make the deck worse overall.
For example, burn is a notoriously bad matchup for mill. However, if you added cards to combat burn specifically it would weaken your deck’s strategy against all other decks.
Testing against a veriety of matchups is also great practice with your deck, which is extremely important.
Test As Your Opponent
By this I mean have someone else play your deck against you. Playing against your deck with opposing decks gives you a completely new perspective that can be invaluable in understanding your deck’s strengths and weaknesses. This not only helps for the deck you are currently testing but your future decks as well.
This is because instead of thinking about mainly how the deck you built will succeed, you’ll now be thinking about how to defeat it. This will help in several key ways.
First, it will put you into the mindset of asking “how do I lose this game?” while playing instead of only “how do I win this game?” This shift in mindset alone will help you win more games. Second, you’ve had a look behind enemy lines so to speak. Testing as your opponent will give you more in-depth knowledge of the particular matchup and how best to play it.
Lastly, it can be quite a bit of fun to mix things up and can break up the monotony of long play-testing sessions. It will also make you a much better Magic: the Gathering player in general.
Test Possible Replacements While Playing
This is a neat trick to help you gather data about one card versus another while testing and will help a lot with your deck-building.
As an example, let’s say you play three Edgar, Charmed Groom in your deck. Let’s also assume that you’re considering replacing it with three Bishop of Binding for whatever reason, but you aren’t sure.
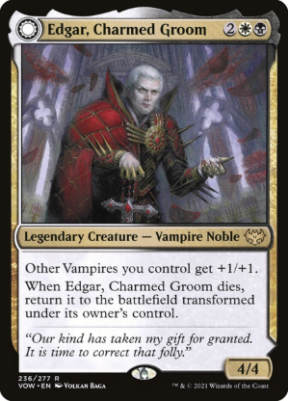
Each time you draw Edgar, Charmed Groom stop and evaluate the
Not only does this allow you to essentially test both cards at the same time but it gives you a means of comparing them in the same exact situations.
Make Changes
The refinement stage is very important for the success of your deck. It will likely need a few tweaks after testing. If you’ve had replacement cards in mind for certain things and tested them with the methods above then you may already know what changes to make.
If not, then simply start by looking at the problem areas or cards and why they don’t work. From there start back at the beginning and look for cards that better serve your strategy. There are a few important things to remember here though.
First, assuming your strategy worked at all, these will be refinements, not overhauls. So don’t be too extreme with your changes. For example, if you consistently didn’t draw enough lands, swap out cards for more lands one or two at a time. Don’t add in five lands all at once.
Next, you must account for changes to your mana curve and the colors of your cards. So, don’t take out a one-mana spell and replace it with a 6-mana spell without making the necessary adjustments.
The same is true for card color. For example, you’ll need some adjustments to your mana base if you want to replace Archangel of Tithes with Eradicator Valkyrie.
Unless you feel that your deck needs a complete overhaul, take things slow and only change them as much as is necessary to fix the issues.
Practice Makes Perfect
Once you have landed on a list that you feel is cohesive enough to be powerful and consistent, don’t stop there. Continuing to play and practice with your deck will substantially increase your chances of winning with it.
Not that you have to stick to just one deck, but things like switching to a deck you don’t know as well because it’s supposed to be good in the current meta are likely to do you more harm than good. Practice with your deck and practice against your deck with other decks and you’ll know your deck like the back of your hand.
This alone will win you a lot of games you may have otherwise lost. One final piece of advice is to keep your eyes open when new cards are released for any cards that are good additions to your list.
End Step
Magic: The Gathering deck-building is a genuine passion of mine. Like many other players, I find the complexity and problem-solving aspects quite engaging and rewarding. There are nearly countless things that go into building a good deck, and most are an acquired skill. So, whether you’ve just now started your deck-building journey or are a long-time brewer looking to breathe new life into their list I hope this guide has been of some use to you.